


Resin driveways are an increasingly popular choice for homeowners who want a durable, low-maintenance, and attractive driveway. One of the most important factors in ensuring the longevity and performance of a resin driveway is proper ground preparation.
In this article, we will discuss the key steps involved in preparing the ground for installing resin driveways.
Step 1: Site Inspection
The first step in preparing the ground for a resin driveway is to conduct a site inspection. This involves assessing the existing driveway or area where the new driveway will be installed. The site inspection should identify any existing issues, such as drainage problems or uneven surfaces.
It should also consider any factors that may affect the installation process, such as the location of underground utilities.
Step 2: Excavation
Once the site inspection is complete, the next step is to excavate the area where the resin driveway will be installed. This involves removing the existing driveway or any vegetation in the area. It is important to excavate to a sufficient depth to allow for proper drainage and a stable base. Typically, a depth of 200-250mm is recommended.
Step 3: Sub-base Preparation
After excavation, the sub-base should be prepared. The sub-base is the layer of material that will provide the foundation for the resin driveway. It is important to use a suitable material for the sub-base, such as MOT Type 1 or crushed concrete.
The sub-base should be compacted to ensure it is stable and level. It is also important to ensure that the sub-base slopes away from any buildings or structures to allow for proper drainage.
Step 4: Edging and Drainage
Edging and drainage are important factors to consider when preparing the ground for a resin driveway. Edging will provide a defined boundary for the driveway and help to keep the resin in place. It is important to use a suitable edging material, such as concrete or brick, and ensure that it is firmly anchored in place.
Drainage is also a critical factor in the ground preparation process. Proper drainage will prevent water from pooling on the driveway, which can cause damage to the resin and lead to other issues. There are several options for drainage, including channel drains, soakaways, and permeable paving. The choice of drainage system will depend on the site conditions and local regulations.
Step 5: Membrane Installation
After the sub-base, edging, and drainage have been installed, the next step is to install a membrane. The membrane is a layer of material that will prevent weeds from growing through the resin and provide additional stability for the driveway. The membrane should be laid over the sub-base and cut to fit the shape of the driveway.
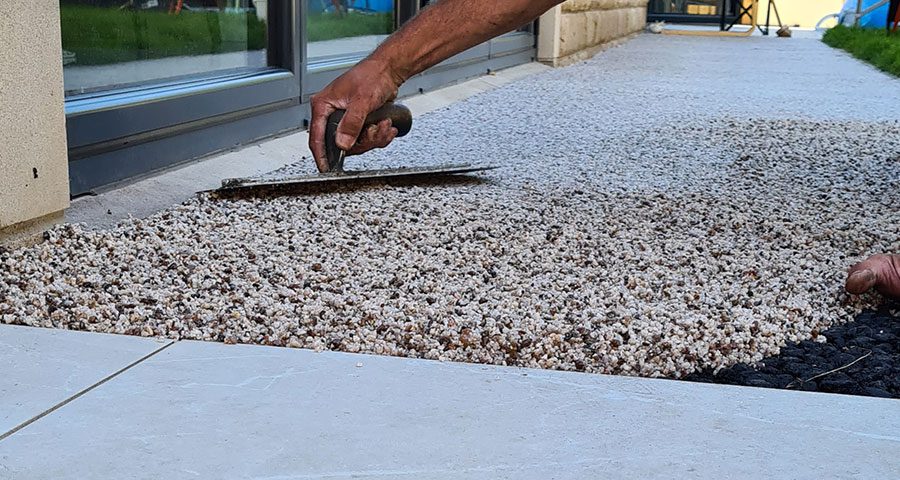
Step 6: Resin Application
The final step in the ground preparation process is the application of the resin. The resin is a two-part mixture that is applied over the membrane using a trowel or roller. It is important to ensure that the resin is applied evenly and to the correct thickness. The thickness of the resin layer will depend on the type of resin used and the expected traffic load. Typically, a thickness of 15-18mm is recommended.
Step 7: Curing Time
Once the resin has been applied, it will need time to cure before it can be used. The curing time will depend on several factors, such as the temperature, humidity, and thickness of the resin layer. Typically, a curing time of 24-48 hours is recommended before the driveway can be used for light traffic. For heavier traffic, it may be necessary to wait several days before using the driveway.
It is important to follow the manufacturer’s instructions for curing time and avoid using the driveway too soon. Walking or driving on the driveway before it is fully cured can cause damage to the resin and affect the final finish of the driveway.
Step 8: Finishing Touches
Once the resin has cured, the final step is to add any finishing touches to the driveway. This may include sealing the surface with a protective coating, adding decorative features such as patterns or colours, or adding lighting to enhance the visual appeal of the driveway.
Adding finishing touches can help to enhance the overall appearance of the driveway and make it more functional for the homeowner’s needs. It is important to work with a professional installer who has experience with resin driveways to ensure that the finishing touches are applied properly and that the final result meets the homeowner’s expectations.
Benefits of Resin Driveways
Resin driveways offer several benefits for homeowners, including durability, low maintenance, and visual appeal. Unlike other types of driveways, resin driveways are resistant to oil and chemical spills, making them easy to clean and maintain. They are also permeable, which means that water can drain through the surface and reduce the risk of flooding.
In terms of visual appeal, resin driveways offer a wide range of options for customisation. Homeowners can choose from a range of colours, patterns, and finishes to create a unique and attractive driveway that complements the style of their home. Additionally, resin driveways are highly durable and can last for many years with proper care and maintenance.
SUDWell Resin Driveway is a high-quality resin driveway system that is designed to provide a range of benefits, including permeability, UV stability, durability, and ease of maintenance. By choosing SUDWell for their resin driveway installation, homeowners can enjoy the peace of mind that comes with knowing that their driveway will provide a long-lasting and attractive surface for their home.